If you do not have moca.jar in C:\Program Files\Oracular MOCA Client (or wherever you installed the program), you must copy it from %MOCADIR%\lib from any working instance of RedPrairie. Without it, the program will not work. The version from 2005 is known not to work and the version from 2007 is known to work.
*New in 2010* Copy MOCA/lib/moca-core.jar to C:\Program Files\Oracular MOCA Client\moca.jar (Yes, change the filename from moca-core.jar to moca.jar)
Smart MOCA Client was developed to improve upon RedPrairie’s WinMSQL. At the time, WinMSQL could not open multiple tabs for connections and did not allow the user to cancel execution, which could force the user to close the window by force and start another, a time-consuming and unnecessary process. Smart MOCA Client resolves these issues and is more efficient and user-friendly.
Oracular MOCA Client is now called Smart MOCA Client to reflect Oracular's new name, Smart IS
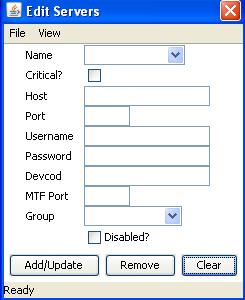
Choosing File -> Edit Servers brings up this dialog:
If entering a 2010 server like "http://localhost:4500/service", enter that as the host. Port does not need to be entered.
The servers already entered into RedPrairie are automatically loaded from the file C:\Documents and Settings\All Users\Application Data\RedPrairie\DLXClient\DLXClientConfig.xml
Critical servers start with Auto-Commit turned off and the user is prompted to confirm each execution.
Choose a server name from the list loaded by the server dialog and click the Connect button or hit Alt-C.
![]()
If the server does not have a username or password defined, you will be prompted for it. The program now attempts to make a connection. This may take some time. If connection was successful, a new tab will be opened below. If not, a dialog will pop up indicating the error.
Type a command in the text box and hit ENTER, Alt-E, F5, or click the Execute button to execute. The status bar below will change to “Executing…” and will change again when execution is complete. If any text is selected, that will be the command executed and not the entire contents of the text editor.
Press “Queue Cmd” or Ctrl-Q to execute the next command immediately after the current one has ended.
Click the Cancel button in lower-right corner of the screen. This will also cancel MLoad with CTL if running.
Command completion was developed for commands that get a lot of use and can be successfully guessed, saving the user from typing the entire command out. For example, if you begin your command with “[“, the program will guess that you typing a select query and will fill out the command as “[select * from where rownum < 99]”. If the guess is correct and you would like to accept the command as shown, hit TAB, and the caret will be moved to the position where you would enter the table name. These stored commands are defined in %appdata%\Oracular MOCA Client\MOCADev-Commands.txt. “START” defines the position the user is taken when he or she hits TAB.
*NEW in 2010.6.0*
Place custom commands in the Usr-MOCADev-Commands.txt file.
To turn on trace mode for a tab, hit Alt-T or click the Start Trace button in the center of the tab. Then, execute commands as normal until you are ready to stop tracing. Hit Alt-T again or click the Stop Trace button. You will be asked if you want to get the trace file now. If you select yes, the table will be filled with the trace file. All trace levels are included in the file. The index of a tab can be seen in the tooltip text of the “Start Trace” button. If the trace file is too large to be quickly opened, you will be given the option to retrieve the last X bytes of the file.
On start up, an xml file is downloaded to check the current version. If a new version is available, you will be asked to download the setup program. After it is downloaded, it will automatically be launched.
Load the text box with a text file.
Save the contents of the text box to a .msql file.
Loads the tabs and history defined in the .mds file.
Saves the open tabs and history to a .mds file.
Brings up a dialog of every command executed for the current server. Double-click to select a command.
Ctrl-Left: Shift Left
Ctrl-Right: Shift Right
Right-click on the text area with some cells selected and you have the option to insert the table data as text. The following is what each function does for each selected cell.
· TAB key
o If before a where clause, adds “ = ‘’ and ”
§ If Shift is held, adds “ like ‘%’ and ”
o If at the end of a single-quote terminated string , adds “ and = ‘’”
§ If Shift is held, adds and like ‘%’
o If there is a string like ‘’ or ‘%’ ahead on the line, places the caret inside the string
o If Shift is held at the end of a column name like dtlnum| = ‘’, it turns into “dtlnum = @dtlnum|
· Add Clause
o Inserts and <column_name> = <value> for every cell selected in the row.
§ If the selection is of multiple rows of the same column, an in clause will be added instead.
· Add Columns
o Inserts a comma-separated list of the column names selected in the table.
· Add Values
o Inserts a comma-separated list of the values selected in the table.
· Update Columns
o If the TextArea contains a select statement, this appends | and sl_change gen_maint where pk_upper_case = 0 and table_name = ‘<table>’ plus any values selected from the table.
· Get Command Arguments
o Select a command and this will find the .mcmd file and add all the arguments it finds.
· Join to another table - select one table, choose this, and a list of tables will pop up to join to. You have the option to give the new table an alias.
· Join Tables
o Select two or more tables and a join by primary key will be appended if possible. If the names are separated by "join" it will use join syntax, if they are separated by ",", you will be asked which syntax you want.
· Select table by PK - adds the PK as a clause with MOCA variables
· Explain Query
o Select a bit of SQL and choose this to explain the query.
Ctrl-R: Copy results to clipboard as "publish data" commands
Ctrl-I: Copy results to clipboard as insert statements
Ctrl-U: Copy results to clipboard as "sl_change gen_maint" commands
Stored in %appdata%\Oracular MOCA Client\Var Commands
These are scripts that show up for use when right clicking the grid for certain variables.
Actions for prtnum, ordnum, ship_id, etc are already defined.